New expansion - UPD858 SSB chassis
Posted: 09 Jan 2020, 02:50
Better rather late than never - the "no SMT" expansion that will fit nearly all SSB capable radios that use a dowmixer type PLL circuit.
First one done is the old uPD858 chassis from the late 1970's. The mod should also work with the uPD2824 (i./e Cobra 146, President AR144)
and the MB8719/MB8734 (i.e. Cobra 148 / 2000) radios with only minor changes, these will be tried as suitable radios come to hand. We already have both a uPD2824 (AR144) and an MB8734(Cobra 148 side mic) radio waiting for installation, and others such as the GRE / REC86345
(Realistic TRC-448) and the NDI (Johnson, Liner, Pace, SBE) are on the eBay / Gumtree shopping list.
No promises as to when the others will be done, we've had a rather busy year with no time for experiments, but hopefully sooner than later.
First up, warning. This is intended for people experienced with RF and digital electronics and are comfortable inside a radio. It is NOT a beginner "cut the orange wire and solder it to the green one to make your radio put out 50 watts" style change.
This works - I've done 4 radios this way in the last week - but I can't control your ability. In short - if you skipped something obvious and fried your own radio, don't blame me. If you are not 100% sure what you are doing, ask here nicely or take it to a competent technician.
This is a work in progress project still under development, and may contain bugs. So don't do this on your primary or only radio just yet.
Any bug or success reports gratefully appreciated though!!!
Now we've got that out the way... back on track.
The requirements we set for this project are:
1) Mod must be reversible, so no cut tracks / drilled holes / dremel butchery. These radios are most valuable in standard form, so mod must be easily undo-able for radio resale.
2) No SMT. Not everyone tinkering with old radios has the ability or equipment to work with these tiny devices.
3) No sensitive analog / RF components such as coils / crystals, and little or no wiring where length of cables is critical.
4) Able to give large amounts of "slide" or add dual coarse/fine clarifiers without drift or instability.
5) All components currently / readily available through online sellers such as Ebay / Amazon, or at a pinch Mouser / E14 / Digikey.
6) Cost of parts under AUS$25 (20 USD / Euro / UKP) including the programming hardware.
Only way to achieve this was by going digital. If you've never used a programmable microcontroller before you might have a bit of a learning curve with these. The only semi-critical piece of equipment needed is a bench type frequency counter, at least 7 digits of resolution will be needed, 8 is better (i.e 1Hz resolution at 30 MHz). Having other high end gear (scope, spectrum analyzer) is nice to align the rest the radio, but is not needed to install the mod.
The oscillator used is claimed to be stable at 10ppm, this works out to within 340Hz at the 27Mhz output frequency. If there is not too much
temperature variation at the radio, such as in a base station, it's adequate for SSB use. For situations where there are extremes - such as in a car
here in Australia where it can get to 50 degrees C (120 Fahrenheit) in the daytime and near freezing at night - we made a stabilizer to make it stable to within a few Hz. It's not included here as it involves tiny SMT component changes but we'll post this later for anyone that wants extreme stability and is able to do the soldering needed.
The heart of the mod is the Adafruit Si5351 programmable oscillator board. This is a tiny board - not mush bigger than a square inch - is a double PLL/VCO that can be programmed over a serial pair of wires to generate any frequency from 8Khz to 160MHz in 1Hz steps. It has 3 outputs but only 2 are used (the third output is not completely independent of the other two).
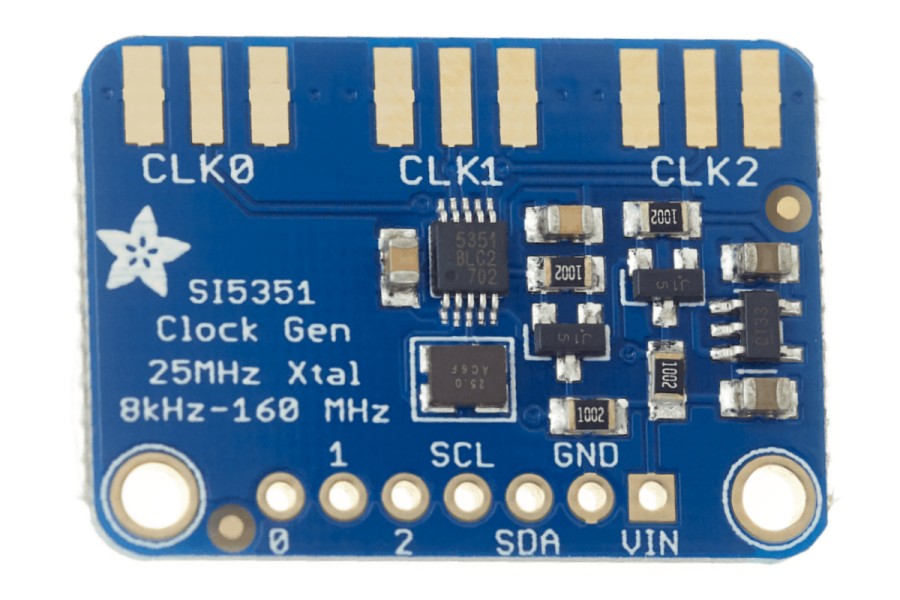
The Adafruit board
The first output (CLK0) is used as a test point to accurately "trim" the new synth onto frequency. The second (CLK1) is used to replace the radios 3 11Mhz downmixer crystals. In the radio, the radios 3 11Mhz downmix oscillators are used to generate the SSB offsets and the small clarifier changes. The VCO operates in the 34MHz region and needs a downmix signal of about 1 MHz due to the low speed of the early dividers in the PLL chip, so the 11 MHz signals are over-driven, generating harmonics,and a filter is used to pass only the third (i.e. 33 MHz). This is then mixed with the 34MHz VCO and the resulting 1 MHz difference signal is fed back to the PLL to lock the loop.
The filter is relatively narrow as it has to reject anything other than 33 MHz. By generating the 33 MHz signal directly, the filter is less critical, and actually needs to be a bit wider so the changes for the different bands don't drop the amplitude of the difference to the point where the uPC858 PLL can no longer achieve lock. It's easy to change the tap on the filter transformer to achieve this, and completely reversible (no track cut needed) if you want to return the radio to standard.
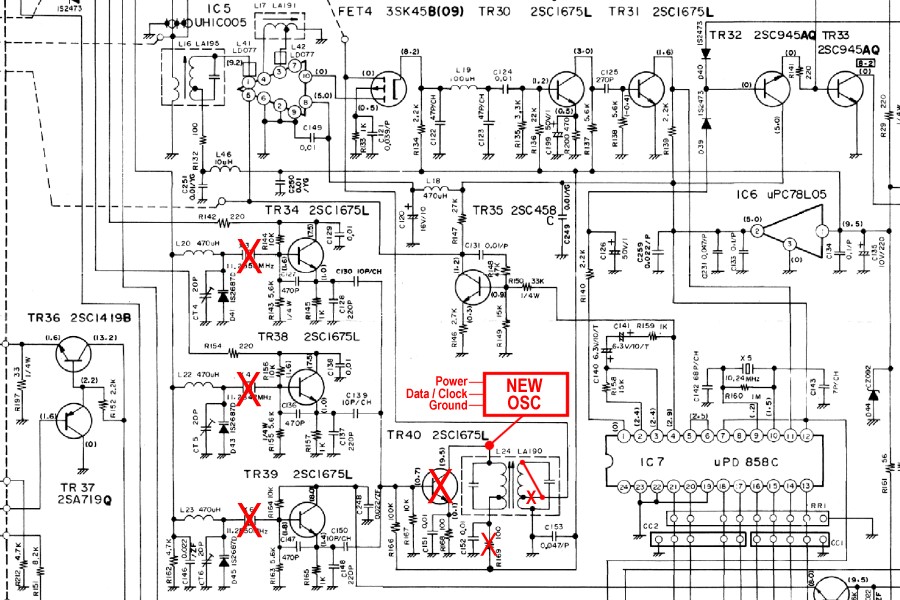
Components removed (large red X) from the original circuit. The centre tap on the transformer can be just de-soldered (small red X).

Removed downmix components and modified transformer tap.
Don't forget to remove the resistor, leaving that in will destroy the adafruit board from over-voltage!

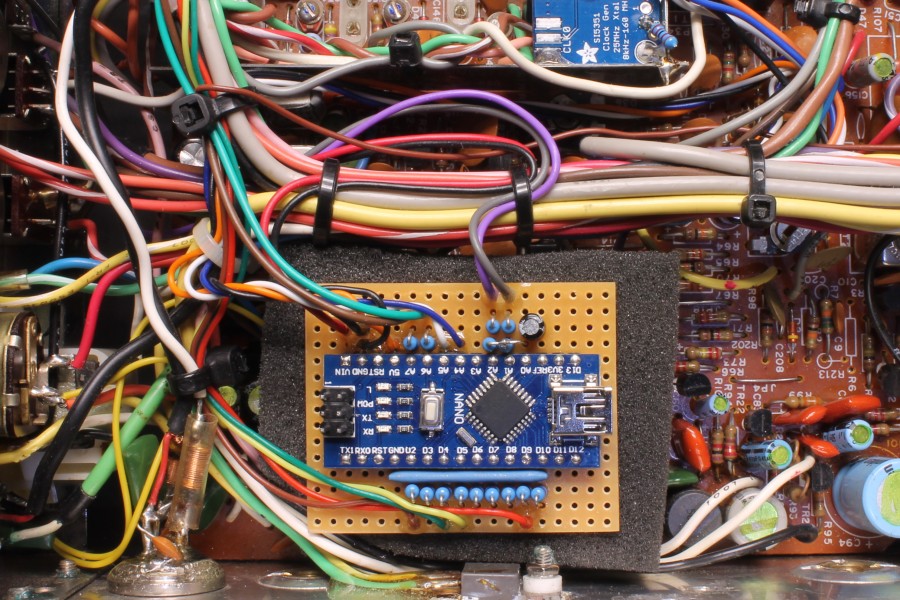
Adafruit board added as close to the downmixer section as possible.
The CLK1 to centre of the removed transistor wire should be kept as short as possible.
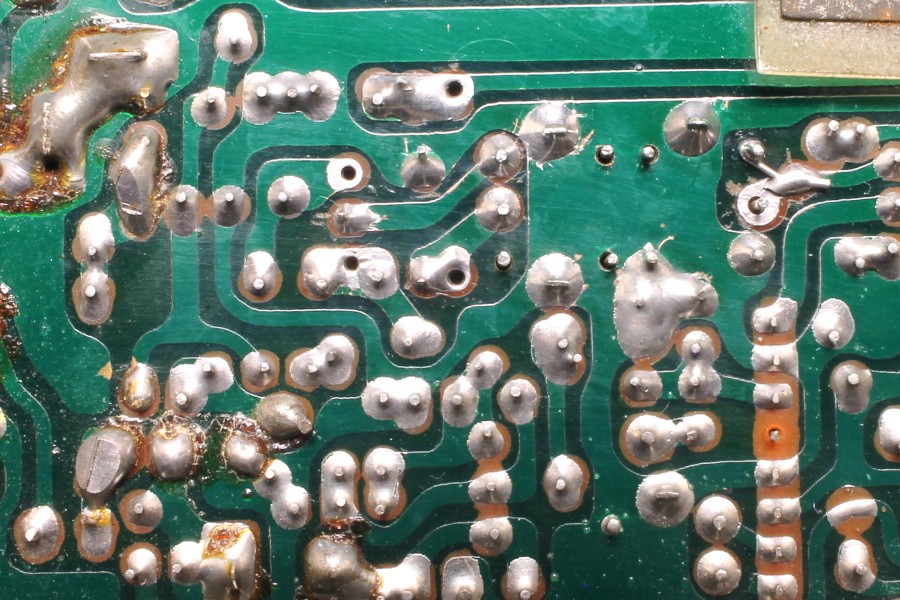
Print side of board, showing the tap change.
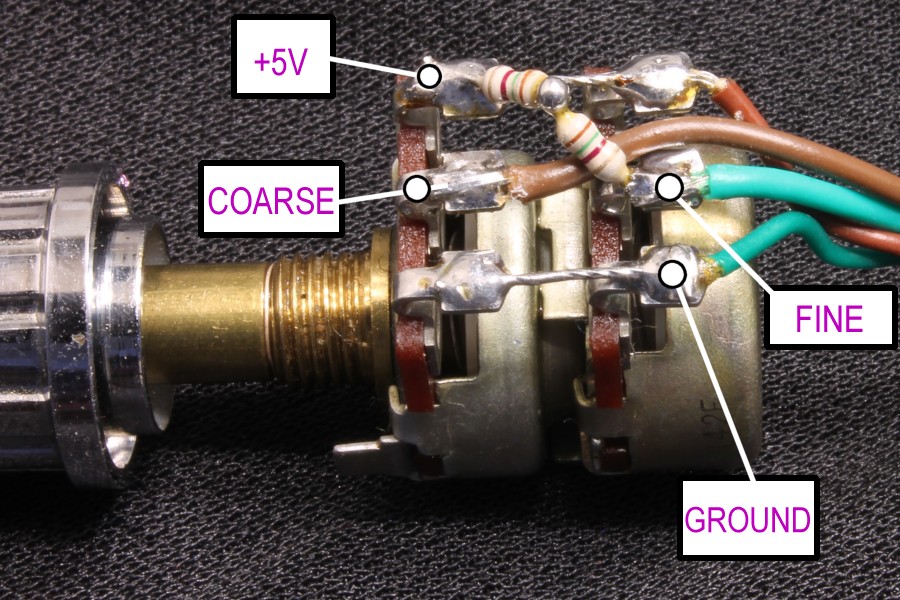
To control the board, a microcontroller is needed. A few passives are needed to isolate the 12V and 9V inputs from the 5V maximum rated controller IC. The Arduino Nano is used here, very cheap and has a USB port on it that can be used to tune the radio onto frequency. The 9V and 12V inputs are needed so the radio can tell the radio what mode and band are current, and if it's transmitting or receiving. The coarse and fine clarifier pots also connect to the controller board.
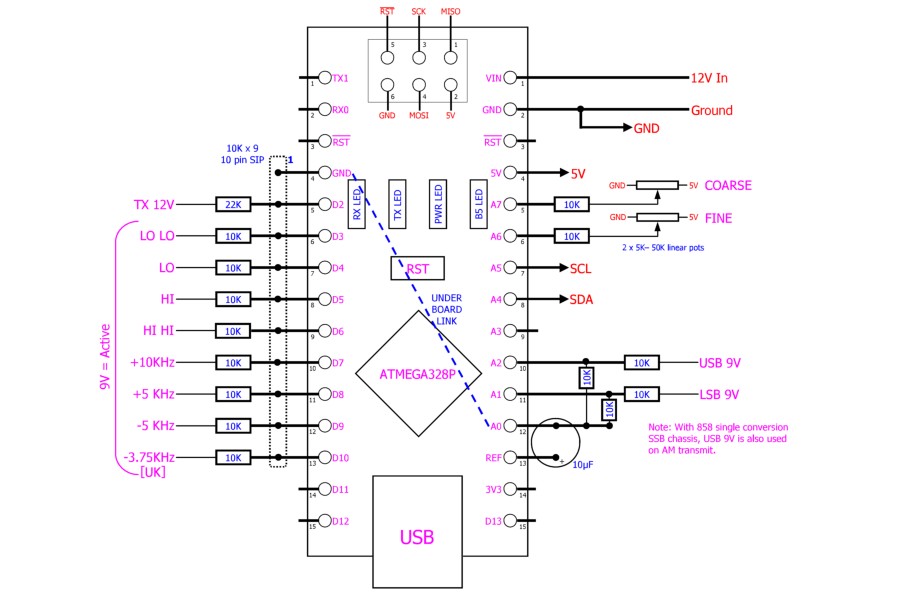
Control board wiring diagram
The wires used are:
TX 12V = 12V on transmit, no voltage on receive. From the Tx/Rx relay.
LO LO = Band A
LO = Band B
MID / Band C = no voltage on LO LO, LO, HII, ot HI HI
HI = Band D
HI HI = Band E
+10KHz, +5KHz, and -5KHz = used to get the gap "A" channels and to get the "zeroes"
UK = 3.75 KHz drop, for example using this on Hi band channel 40 gives UK channel 26 (27.85125 MHz) at centre clarification.
12V in / Ground = power to the controller board
5V OUT = power to the two clarifier pots and the Adafruit board
COARSE / FINE = the "wiper" terminals of the clarifier pots
SCL and SDA = Adafruit board control lines
USB9V = +9V only on USB and on AM Transmit. Available from the mode switch or one of the 220 ohm resistors near the removed crystals.
LSB9V = +9V only on LSB. Available from the mode switch or a 220 ohm resistor near the removed crystals.
Only connect the ones you need. Without complex broadbanding mods, the radio will only cover 3 ranges, i.e. under 1.5MHz of bandwidth.
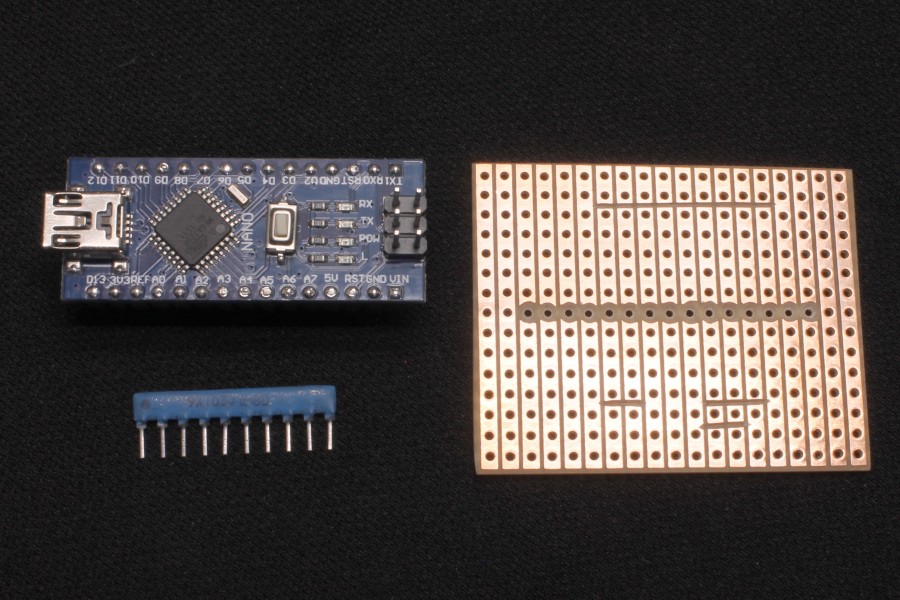
Nano controller board, perfboard, and the SIP resistor.
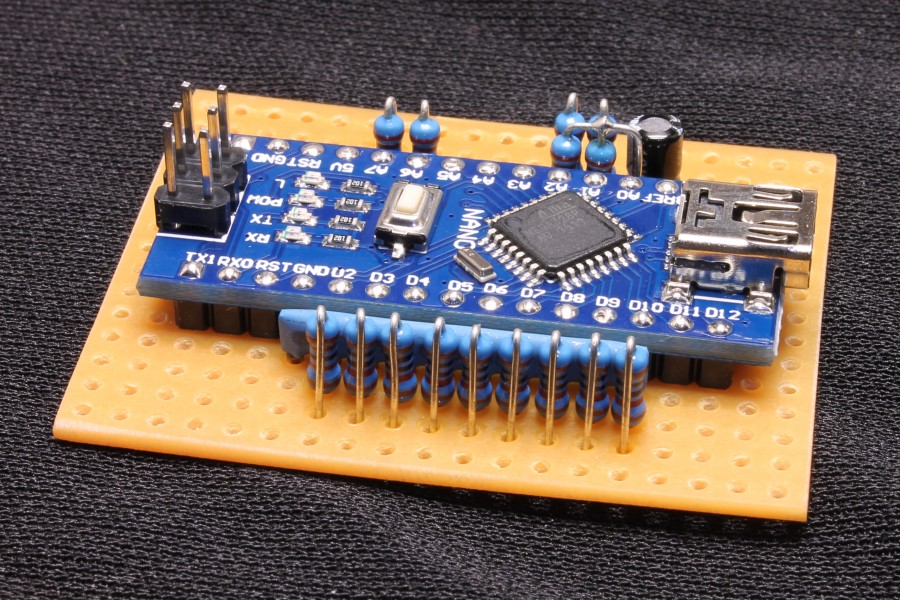
Nano controller board and passives assembled.

Nano controller board bottom link. Forget this and the clarifiers won't work.
< continued below >
First one done is the old uPD858 chassis from the late 1970's. The mod should also work with the uPD2824 (i./e Cobra 146, President AR144)
and the MB8719/MB8734 (i.e. Cobra 148 / 2000) radios with only minor changes, these will be tried as suitable radios come to hand. We already have both a uPD2824 (AR144) and an MB8734(Cobra 148 side mic) radio waiting for installation, and others such as the GRE / REC86345
(Realistic TRC-448) and the NDI (Johnson, Liner, Pace, SBE) are on the eBay / Gumtree shopping list.
No promises as to when the others will be done, we've had a rather busy year with no time for experiments, but hopefully sooner than later.
First up, warning. This is intended for people experienced with RF and digital electronics and are comfortable inside a radio. It is NOT a beginner "cut the orange wire and solder it to the green one to make your radio put out 50 watts" style change.
This works - I've done 4 radios this way in the last week - but I can't control your ability. In short - if you skipped something obvious and fried your own radio, don't blame me. If you are not 100% sure what you are doing, ask here nicely or take it to a competent technician.
This is a work in progress project still under development, and may contain bugs. So don't do this on your primary or only radio just yet.
Any bug or success reports gratefully appreciated though!!!
Now we've got that out the way... back on track.
The requirements we set for this project are:
1) Mod must be reversible, so no cut tracks / drilled holes / dremel butchery. These radios are most valuable in standard form, so mod must be easily undo-able for radio resale.
2) No SMT. Not everyone tinkering with old radios has the ability or equipment to work with these tiny devices.
3) No sensitive analog / RF components such as coils / crystals, and little or no wiring where length of cables is critical.
4) Able to give large amounts of "slide" or add dual coarse/fine clarifiers without drift or instability.
5) All components currently / readily available through online sellers such as Ebay / Amazon, or at a pinch Mouser / E14 / Digikey.
6) Cost of parts under AUS$25 (20 USD / Euro / UKP) including the programming hardware.
Only way to achieve this was by going digital. If you've never used a programmable microcontroller before you might have a bit of a learning curve with these. The only semi-critical piece of equipment needed is a bench type frequency counter, at least 7 digits of resolution will be needed, 8 is better (i.e 1Hz resolution at 30 MHz). Having other high end gear (scope, spectrum analyzer) is nice to align the rest the radio, but is not needed to install the mod.
The oscillator used is claimed to be stable at 10ppm, this works out to within 340Hz at the 27Mhz output frequency. If there is not too much
temperature variation at the radio, such as in a base station, it's adequate for SSB use. For situations where there are extremes - such as in a car
here in Australia where it can get to 50 degrees C (120 Fahrenheit) in the daytime and near freezing at night - we made a stabilizer to make it stable to within a few Hz. It's not included here as it involves tiny SMT component changes but we'll post this later for anyone that wants extreme stability and is able to do the soldering needed.
The heart of the mod is the Adafruit Si5351 programmable oscillator board. This is a tiny board - not mush bigger than a square inch - is a double PLL/VCO that can be programmed over a serial pair of wires to generate any frequency from 8Khz to 160MHz in 1Hz steps. It has 3 outputs but only 2 are used (the third output is not completely independent of the other two).
The Adafruit board
The first output (CLK0) is used as a test point to accurately "trim" the new synth onto frequency. The second (CLK1) is used to replace the radios 3 11Mhz downmixer crystals. In the radio, the radios 3 11Mhz downmix oscillators are used to generate the SSB offsets and the small clarifier changes. The VCO operates in the 34MHz region and needs a downmix signal of about 1 MHz due to the low speed of the early dividers in the PLL chip, so the 11 MHz signals are over-driven, generating harmonics,and a filter is used to pass only the third (i.e. 33 MHz). This is then mixed with the 34MHz VCO and the resulting 1 MHz difference signal is fed back to the PLL to lock the loop.
The filter is relatively narrow as it has to reject anything other than 33 MHz. By generating the 33 MHz signal directly, the filter is less critical, and actually needs to be a bit wider so the changes for the different bands don't drop the amplitude of the difference to the point where the uPC858 PLL can no longer achieve lock. It's easy to change the tap on the filter transformer to achieve this, and completely reversible (no track cut needed) if you want to return the radio to standard.
Components removed (large red X) from the original circuit. The centre tap on the transformer can be just de-soldered (small red X).
Removed downmix components and modified transformer tap.
Don't forget to remove the resistor, leaving that in will destroy the adafruit board from over-voltage!
Adafruit board added as close to the downmixer section as possible.
The CLK1 to centre of the removed transistor wire should be kept as short as possible.
Print side of board, showing the tap change.
To control the board, a microcontroller is needed. A few passives are needed to isolate the 12V and 9V inputs from the 5V maximum rated controller IC. The Arduino Nano is used here, very cheap and has a USB port on it that can be used to tune the radio onto frequency. The 9V and 12V inputs are needed so the radio can tell the radio what mode and band are current, and if it's transmitting or receiving. The coarse and fine clarifier pots also connect to the controller board.
Control board wiring diagram
The wires used are:
TX 12V = 12V on transmit, no voltage on receive. From the Tx/Rx relay.
LO LO = Band A
LO = Band B
MID / Band C = no voltage on LO LO, LO, HII, ot HI HI
HI = Band D
HI HI = Band E
+10KHz, +5KHz, and -5KHz = used to get the gap "A" channels and to get the "zeroes"
UK = 3.75 KHz drop, for example using this on Hi band channel 40 gives UK channel 26 (27.85125 MHz) at centre clarification.
12V in / Ground = power to the controller board
5V OUT = power to the two clarifier pots and the Adafruit board
COARSE / FINE = the "wiper" terminals of the clarifier pots
SCL and SDA = Adafruit board control lines
USB9V = +9V only on USB and on AM Transmit. Available from the mode switch or one of the 220 ohm resistors near the removed crystals.
LSB9V = +9V only on LSB. Available from the mode switch or a 220 ohm resistor near the removed crystals.
Only connect the ones you need. Without complex broadbanding mods, the radio will only cover 3 ranges, i.e. under 1.5MHz of bandwidth.
Nano controller board, perfboard, and the SIP resistor.
Nano controller board and passives assembled.
Nano controller board bottom link. Forget this and the clarifiers won't work.
< continued below >